Do something with it!
I guess he didn't have time. For us, it was too much for one meal and late at night. The beautiful pieces of meat, about 1/4" thick, had been frozen but were thawed when he sent it. I decided to turn it into jerky. First I needed to gather supplies. Then I needed a seasoning blend.
Supplies: a baking pan, a cookie rack or some other suitable drying rack, a meat tenderizer, a wooden board. Now, when I say meat tenderizer, I mean a tool that looks like a hammer that has a rough face, not a blend of chemicals.
Seasonings that I've made in the past were teriyaki, garlic, and hot and spicy. I make my own blend with a Krups spice grinder, but there are perfectly good blends on the market. For this jerky, I made it mildly spicy, although just being near the blend while I was grinding it could take your breath away. I started coughing! The seasonings I chose were: red pepper flakes, paprika (for another layer of depth and smokiness), salt, and black pepper. Experiment with amounts to suit your taste. Very simple. (None of those other terms you'll see on Uncle Buck's such as hydrolized soy protein, dextrose, caramel color, potassium sorbate, sodium erthorbate, or sodium nitrate.) I want a product that's good for you, not one that will last my lifetime!
 |
| This tenderizer makes seasoning and pounding easy. |
 |
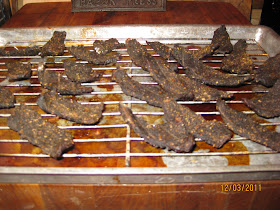
| Lay the seasoned, pounded pieces on the rack. |
Begin by laying out your meat on the cutting board and sprinkling each piece liberally with your seasoning blend. Use the tenderizer to pound the pieces to almost half the thickness. Turn the pieces over, sprinkle with seasoning, and pound. When you're finished, your pieces should be about 1/8" thick or so.
Place on an oven-proof rack on a baking sheet. Put into a 170 to 200 degree F oven for about 4 hours. Turn. Watch them in about an hour and check for dryness. The pieces, still warm, should have a little flex to them. They don't need to be perfectly brittle. As they cool, they'll lose more moisture. Cool completely before wrapping for storage.
 |
| The rack allows plenty of air movement so that the jerky won't stew in its broth. |


I need to try this, I know hubby would like it!
ReplyDeleteHubby made a couple batches of deer jerky. Our first time making it in the oven, usually use dehydrator. He added many seasonings and such and turned out very good. My mom even liked it! Thanks for posting this on your blog Ronda.
ReplyDeleteI keep staring & salivating at that jerky :)
ReplyDeleteWe love home made deer jerky. We make our in a dehydrator. I got our recipe from a friend of my sons.
ReplyDeleteJanet, it's a wonderful treat! Glad you've already been making your own--so much better than what you can buy!
ReplyDeleteDanita, I'm sure Mike's is very good! He's a pioneer! Today I'm making the cookies for your party! I can hardly wait!!!
ReplyDelete